Our customer service team in the US is ready to assist you.
Monday - Friday
7 AM – 4 PM PT
Saturday
7 AM – 4 PM PT
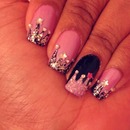
As I mentioned in my other tutorial, I really like splatter nail art on just a part of the nail rather then on the whole nail. Here's another super cute and easy design! Personally, I love the more globby kind of splatters so I choose to hold my straw closer to my nail. But small splatters are cute too!!
Show More
As I mentioned in my other tutorial, I really like splatter nail art on just a part of the nail rather then on the whole nail. Here's another super cute and easy design! Personally, I love the more globby kind of splatters so I choose to hold my straw closer to my nail. But small splatters are cute too!!
Splatter nail art is actually not that messy. Just do it over a paper towel or piece of paper. You can clean the sides of your fingers with a brush dipped in nail polish remover OR I find paper towel - folded once with the sides dipped in nail polish remover to work really well. Q-tips aren't the best for trying to remove bits of polish near your nails, as its not very precise.
Nail polish I used:
OPI natural base coat
Love Bites? - A black nail polish
OPI alpine snow - white
Lol I don't know - A dark blue nail polish
Sally Hansen amazing blaze - hot pink
A silver stripper
Rimmel London base and top coat pro
Other things I used:
plastic bag
tape
a straw - I just used a straw from a juice box
Music:
"Carefree" Kevin MacLeod incompetech.com
Licensed under Creative Commons: By Attribution 3.0
http://creativecommons.org/licenses/by/3.0/
Show Less
Apr 10, 2015
Maxie D.
These might have been the most beautiful nails I have ever seen!
Apr 10, 2015
AcuteMelle o.